|
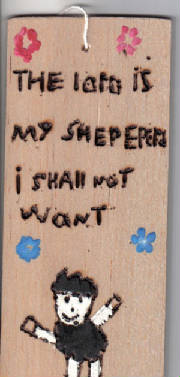
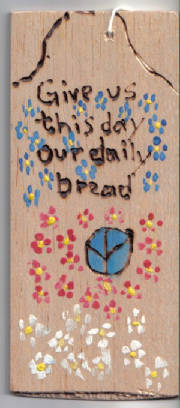
PHOTOS 4 & 5. TWO SAMPLES OF 'FOOD COLOURING' BANNERS FOR LYDIA UNIT.
In the 1st, you can see the artist tried to use lots of purple and surround with border of purple flowers. 2nd sample is useful
to show how if you fill in entire cotton panel with colour, you get different neat effect that maximizes spreading property
of the food colouring. Colours mix really well -- for ex it's easy for kids to blend the red and blue and get a nice dark
purple.
This activity was simple to pull together if you plan to use bamboo skewers as rods for the banners (or scrolls), and cut
cotton panels to fit width of skewers. Needs lots of food colour -- get biggest bottles you can find. Large brushes not nec
because colour really spreads. Fold and staple tops over skewers. Stick plasticine blobs on ends to secure.
Between the tie-dye shirts and the food colour scrolls, you get enough dye on your hands with the activities in this unit
to give excellent reinforcement of idea of Lydia as seller of purple-dyed cloth!
*****************************************************
MINI BREADBOARDS FOR LORD'S PRAYER, LAST SUPPER OR THANKSGIVING ACTIVITY.
| MINI BREADBOARD |
|
| FOR LORD'S PRAYER ROTATION. Click here for larger view. |
| ANOTHER MINI BREADBOARD |
|
| FOR LORD'S PRAYER ROTATION. Click here for larger view. |
MINI BREADBOARDS USING WOODBURNING TOOL. This activity uses materials even the most toolbox challenged person can handle!
The wood is from a balsa wood strip (1/8 x 3 x 36 ins.), worth $4.25 CDN at a hobby store. (We also tested thinner balsa wood.
It was easy enough for an adult to manage, But my 9 yr old felt the thicker board didn't split and she could press harder
to burn her letters.)
I cut this into about 5" lengths with a stout boxcutter. The kids sanded down the split edges. Then they tapped a nail hole
gently thru both sides in the top, and sanded it. The woodburning tool came from the craft section at walmart, worth about
$11 CDN. It came with several tips and 5 little pots of oil paint and a brush.
NOTE ABOUT WOODBURNING TOOL -- IT IS REALLY HOT. My 9 yr old did the board with the sheep. She was determined to try it, but
she might as well have been holding that tool with a Canad-arm! For kids younger than 9 then, I would burn the text in before
hand. I think the youngest kids would still enjoy sanding, tapping with a small (even toy) hammer, and painting (front and
back if they wish) on their boards.
We made one board that was even short and square -- about 3 x 3. It was very cute. Reminded me of an ornament. Maybe a few
of these could form some kind of LP/TG centrepiece.
**********************************************************
GRACE CUBES. THANKSGIVING/LP ACTIVITY.
| GRACE CUBES |

|
| CLICK HERE FOR LARGER VIEW. |
GRACE CUBES. These were inspired by the wooden grace cube picked up by a friend at Iona. Wood was a bit tricky. So the top
cube here was made by gluing text bits on to a 3 x 3 styrofoam cube, walmart, 87 cents. The graces were found on the web,
then dropped into a template for 2.75 x 2.75 diskette labels.
The lower cube was a hand made, taped together cube, cut from file folder cardboard. Graces were glue sticked on. The kids
personalized with markers and stickers. Then 3 x 3 squares were cut from laminating/contact paper.
Our kids like having the cubes for variety at mealtime. Could be good for a LP/TG unit. The original cube was found useful
in youth group setting. I'm planning on having my jr youth group make these at one of our meetings.
Here's the link to those graceson the web. .
*******************************************************
HOBBY HORSE DONKEY FOR PALM SUNDAY.
| HOBBY HORSE DONKEY. FOR PALM SUNDAY. |
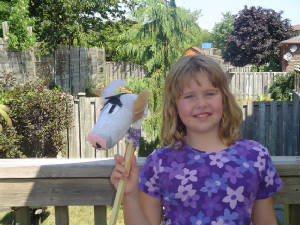
|
| See PS unit for instructions. Click here for larger view. |
********************************************
CANDY STABLES -- CHRISTMAS III
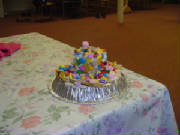
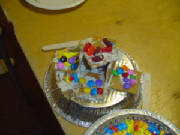
Our jr. youth group made these candy habitats as part of a session on Habitat for Humanity. But we used the instruction for
gingerbread stables found in the Christmas III unit on this site. Here we used melted white chocolate chips as glue, and graham
crackers as the walls. I bought way too many crackers. One box would easily have been enough for the whole group. We used
recycled foil pie shell tins as bases for our habitats. This worked well and gave the kids a nice wide circumference to work
with. We spread the 'glue' with craft sticks. I melted the chips in small coffee cups from the kitchen, and the kids worked
2 to a cup.
.................
MODEL FISHING BOAT
For Call of the Disciples, Feb. 07
Click on thumbnail below for larger view of this model.

Materials: cereal cardboard, tape, glue gun, craft sticks, clay, cloth, yarn, small dowels, netting (onion bag or clementine
boxes).
Easy to make, big hit!
.................
| Cakes in a tin |

|
| Click here for larger view. |
LITTLE CHRISTMAS CAKES IN A JAR (OR TIN) (or tin)
I had trouble picturing how this would work. Recent with a lot of skaggy apples to use up, I made a couple of batches of apple
cake, and baked them in different containers.
I didn't like the wide mouth mason jar. It still has a neck that's hard to slide the cake past.
Since I was also making peach jam at the time, I had tons of little glass no-neck jam jars, I thought I'd try one. I was really
happy with the results here. These little cakes would be perfect for someone like my mom, one person living alone who doesn't
need a whole cake taking up room in her fridge.
I also had some left over small Christmas tins from the dollar store. They are pretty cheap, of course, but rinsed out jam
jars would be cheaper. That's what I would do, anyway.
***2 Key things to remember about smaller containers -- 1. Only fill up half way so they don't erupt out the top. 2. Don't
bake for as long as directions say. The jam jar cakes really cook up fast.***
| Little cake for 1 in a jam jar |

|
| Click here for larger view. |
|


